Centos 8 LAMP (Linux, Apache 2.4, MySQL 8.0, PHP 7.2) server setup
This is a tutorial on how to setup a basic LAMP server with Centos 8 (released on September 25, 2019) for SCHLIX CMS. SCHLIX CMS v2.2.x series, released in August 2019, works out of the box with only minimal changes to the default configuration in Centos 8. This document is a general guide on CentOS 8 setup and covers basic web server & database setup with emphasis on securing the default MySQL installation and proper configuration of /var/www/html directory without having to disable SELinux with setenforce 0. The following topics are not covered in this document:
- Additional security configuration (e.g. fail2ban, changing SSH port number, etc)
- Further MySQL optimization
- Up-to-date SSL cipher list (only up to September 2019)
1. Overview
Centos 8 shipped with PHP 7.2 with PHP-FPM enabled by default. It also ships with the option to install either MySQL 8.0.x or MariaDB 10.3.x. Please note that the default configuration of MySQL 8.0 shipped in CentOS 8.0 uses a different authentication plugin from its upstream release. See /etc/my.cnf.d/mysql-default-authentication-plugin.cnf. By default, MySQL 8.0 uses caching_sha2_password. However, in Centos 8.0, it's set to use the old mysql_native_password instead for broader compatibilities with other connectors and applications. Other changes: the new Cockpit web interface (default - port 9090) and dnf (yum still works).
2. Initial CentOS 8 setup from scratch
For this tutorial, we selected [Server] for the Base Environment option and selected the following add-ons:
- Remote Management
- Basic Web Server
- Security Tools (semanage, etc)
- System Tools

3. Installation of the required software (MySQL 8.0, PHP 7.2, and Apache 2.4)
Since we already chose the Server setup, Apache is already installed. If you chose the [Minimal Install] option, simply type dnf install httpd.
[root@test-centos8 ~]# dnf install mysql-server mysql-libs php php-fpm php-xml php-json php-mysqlnd php-mbstring php-opcache php-gd php-cliThis command will install MySQL 8.0 server and the following PHP packages:
- PHP-FPM
- XML
- JSON
- Multibyte string
- Opcache
- GD
- Command Line Interface
4. Configuring the Services
First, open the firewall ports (80, 443) for Apache:
[root@test-centos8 ~]# firewall-cmd --permanent --add-service=http
[root@test-centos8 ~]# firewall-cmd --permanent --add-service=https
[root@test-centos8 ~]# firewall-cmd --reload
Enable the services:
[root@test-centos8 ~]# systemctl enable mysqld.service
[root@test-centos8 ~]# systemctl enable php-fpm.service
[root@test-centos8 ~]# systemctl enable httpd.service
Then start the services:
[root@test-centos8 ~]# systemctl start mysqld.service
[root@test-centos8 ~]# systemctl start php-fpm.service
[root@test-centos8 ~]# systemctl start httpd.service
5. MySQL 8.0 Configuration
When you start MySQL 8.0 for the first time, it will be set up with a blank password, as shown in the following log file in /var/log/mysql/mysqld.log:
2019-09-24T23:29:46.393910Z 0 [System] [MY-013169] [Server] /usr/libexec/mysqld (mysqld 8.0.13) initializing of server in progress as process 4104
2019-09-24T23:29:57.907723Z 5 [Warning] [MY-010453] [Server] root@localhost is created with an empty password ! Please consider switching off the --initialize-insecure option.
2019-09-24T23:30:04.432064Z 0 [System] [MY-013170] [Server] /usr/libexec/mysqld (mysqld 8.0.13) initializing of server has completed
To secure the installation type mysql_secure_installation
[root@test-centos8 ~]# mysql_secure_installation Choose yes for all of the questions below and set it to strong password.
VALIDATE PASSWORD COMPONENT can be used to test passwords
and improve security. It checks the strength of password
and allows the users to set only those passwords which are
secure enough. Would you like to setup VALIDATE PASSWORD component?

Press y|Y for Yes, any other key for No: y

There are three levels of password validation policy:

LOW    Length >= 8
MEDIUM Length >= 8, numeric, mixed case, and special characters
STRONG Length >= 8, numeric, mixed case, special characters and dictionary                  file

Please enter 0 = LOW, 1 = MEDIUM and 2 = STRONG: 2
Please set the password for root here.

New password:

Re-enter new password:

Estimated strength of the password: 100
Do you wish to continue with the password provided?(Press y|Y for Yes, any other key for No) : y
By default, a MySQL installation has an anonymous user,
allowing anyone to log into MySQL without having to have
a user account created for them. This is intended only for
testing, and to make the installation go a bit smoother.
You should remove them before moving into a production
environment.

Remove anonymous users? (Press y|Y for Yes, any other key for No) : y
Success.


Normally, root should only be allowed to connect from
'localhost'. This ensures that someone cannot guess at
the root password from the network.

Disallow root login remotely? (Press y|Y for Yes, any other key for No) : y
Success.

By default, MySQL comes with a database named 'test' that
anyone can access. This is also intended only for testing,
and should be removed before moving into a production
environment.


Remove test database and access to it? (Press y|Y for Yes, any other key for No) : y
 - Dropping test database...
Success.

 - Removing privileges on test database...
Success.

Reloading the privilege tables will ensure that all changes
made so far will take effect immediately.

Reload privilege tables now? (Press y|Y for Yes, any other key for No) : y
Success.

All done!
Let's setup the MySQL user for SCHLIX CMS with access only to that database.
1. Create the database (e.g. schlixdb) with utf8mb4_unicode_ci collation.
CREATE DATABASE schlixdb CHARACTER SET utf8mb4 COLLATE utf8mb4_unicode_ci;2. Create the user. In this example, the user is schlixuser.
CREATE USER 'schlixuser'@'localhost' IDENTIFIED BY 'YourPassword123';
3. Grant privileges to that particular user for that particular database.
GRANT ALL ON schlixdb.* TO 'schlixuser'@'localhost';
4. And finally
FLUSH PRIVILEGES;Then just type "quit".
6. PHP Configuration
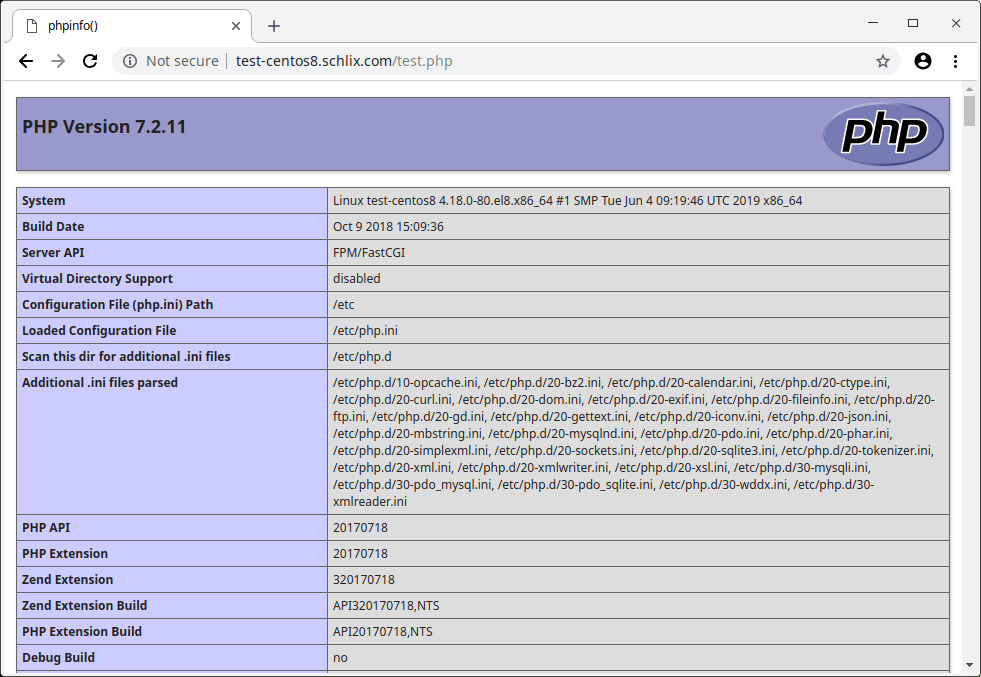
PHP should work out of the box in CentOS 8. To check if PHP is working, create a file test.php in /var/www/html/ containing the following:
<?php

phpinfo();
Then try accessing the file from your web browser:
7. Apache 2.4 Configuration
In this example, we'll use the following domain name: test-centos8.schlix.com. The default root directory has been moved from /var/www/html to /var/www/html/test-centos8/public_html. You can change the ServerName (and Alias if necessary) to suit your needs.
Create a new file called mywebsite.conf in /etc/httpd/conf.d:
<VirtualHost *:80>
    ServerAdmin webmaster@example.com
    ServerName test-centos8.schlix.com
    ServerAlias www.test-centos8.schlix.com
    DocumentRoot /var/www/html/test-centos8/public_html
    ErrorLog /var/log/httpd/test-centos8/error.log
    CustomLog /var/log/httpd/test-centos8/access.log combined
    <Directory /var/www/html/test-centos8/public_html>
        AllowOverride All
        Require all granted
    </Directory>
</VirtualHost>
Please ensure that you've manually created the directories If you customized the DocumentRoot, ErrorLog, and CustomLog config key as in the above example:
- /var/www/html/test-centos8/public_html
- /var/log/httpd/test-centos8
Then restart Apache.
[root@test-centos8 ~]# systemctl restart httpd.service8. SELinux configuration
Before you start the CMS installation, you'll need to configure SELinux. By default, SELinux disables write to the particular directory even if PHP and Apache user (user: apache) has write access to the file. SCHLIX CMS is self-updating and although it can be configured with a manual upgrade, it can be cumbersome especially if this is just a development or test machine.
It's highly recommended to keep SELinux on as it also governs other components in the operating system, not just the web server. It's highly recommended NOT use setenforce 0 as it will compromise the security of the whole machine.
Type the following commands to enable write access to /var/www/html/test-centos8/public_html (or custom web root directory of your choice):
[root@test-centos8 ~]# setsebool -P httpd_unified 1
[root@test-centos8 ~]# setfacl -R -m u:apache:rwx /var/www/html/test-centos8/public_html
[root@test-centos8 ~]# setfacl -R -m d:u:apache:rwx /var/www/html/test-centos8/public_html
[root@test-centos8 ~]# setfacl -R -m g:apache:rwx /var/www/html/test-centos8/public_html
[root@test-centos8 ~]# setfacl -R -m d:g:apache:rwx /var/www/html/test-centos8/public_html
[root@test-centos8 ~]# chcon -t httpd_sys_content_t /var/www/html/test-centos8/public_html -Rv
[root@test-centos8 ~]# chcon -t httpd_sys_rw_content_t /var/www/html/test-centos8/public_html -Rv
That's it.
9. SCHLIX CMS installation
Once you've completed the steps above, you can install SCHLIX CMS.
1. Change the directory to the web root
[root@test-centos8 ~]# cd /var/www/html/test-centos8/public_html/2. Download it with wget and output the file to /tmp/schlix-cms-latest.zip
[root@test-centos8 public_html]# wget -O /tmp/schlix-cms-latest.zip 'https://www.schlix.com/cmsservices/action/get-cms-latest-zip-download-file'3. Unzip the file. This will extract the ZIP file to /var/www/html/test-centos8/public_html/schlix.
[root@test-centos8 public_html]# unzip /tmp/schlix-cms-latest.zip4. Since we're installing it in the example domain test-centos8.schlix.com and not a sub-directory, we can move all the files from extracted ZIP file inside schlix directory. If you want to install it inside a directory, simply rename schlix to something else (e.g. site).
[root@test-centos8 public_html]# shopt -s dotglob nullglob
[root@test-centos8 public_html]# mv schlix/* .
5. Change the file owner to apache user.
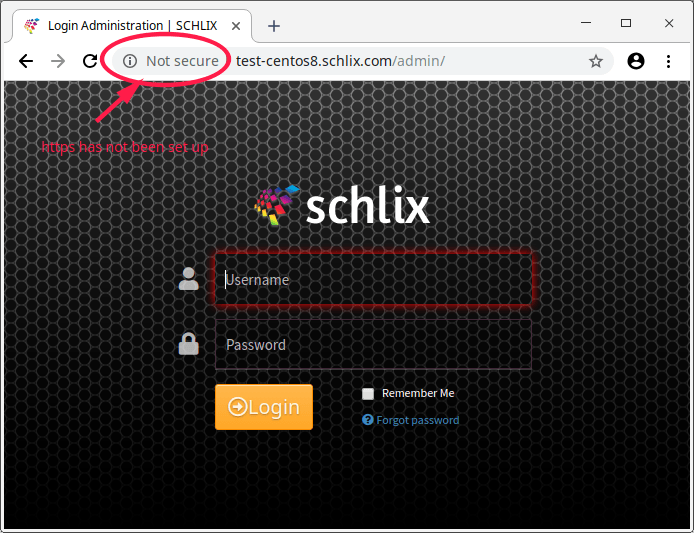
[root@test-centos8 public_html]# chown -R apache:apache /var/www/html/test-centos8/public_html/6. Begin the installation by browsing the domain name from your web browser and you will be prompted to install SCHLIX CMS.
7. Done. However, it will say "Not Secure" since SSL/https has not been set up yet.
10. SSL installation
In this example, we copied the purchased SSL certificate to /etc/ssl/mycert. You'll need all 3 files - the public certificate, the private key, and the CA Bundle.
Add the following lines to the /etc/httpd/conf.d/mywebsite.conf that was previosly created (step 7).
<VirtualHost *:443>
    SSLEngine On
    SSLCertificateFile /etc/ssl/mycert/mywebsite.crt
    SSLCertificateKeyFile /etc/ssl/mycert/mywebsite.key
    SSLCACertificateFile /etc/ssl/mycert/root.cabundle

    SSLCipherSuite EECDH+AESGCM:EDH+AESGCM

    SSLProtocol -all +TLSv1.3 +TLSv1.2
    SSLOpenSSLConfCmd Curves X25519:secp521r1:secp384r1:prime256v1

    SSLHonorCipherOrder On
    Header always set Strict-Transport-Security "max-age=63072000; includeSubDomains; preload"
    Header always set X-Frame-Options DENY
    Header always set X-Content-Type-Options nosniff

    ServerAdmin webmaster@example.com
    ServerName test-centos8.schlix.com
    ServerAlias www.test-centos8.schlix.com
    DocumentRoot /var/www/html/test-centos8/public_html
    ErrorLog /var/log/httpd/test-centos8/ssl-error.log
    CustomLog /var/log/httpd/test-centos8/ssl-access.log combined
    <Directory /var/www/html/test-centos8/public_html>
        AllowOverride All
        Require all granted
</Directory>
</VirtualHost>
Then restart Apache again one more time.
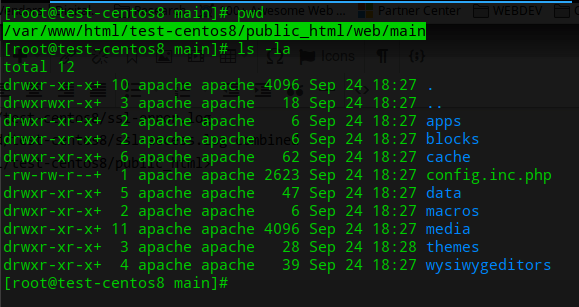
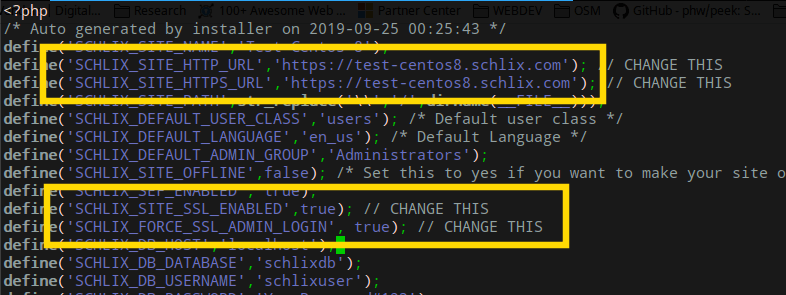
[root@test-centos8 ~]# systemctl restart httpd.serviceEdit config.inc.php from the "main" web subsite directory (full path: /var/www/html/test-centos8/public_html/web/main)
Change the 4 lines below from:
<?php

define('SCHLIX_SITE_HTTP_URL','http://'.$_SERVER['HTTP_HOST'] ); /* Automatic URL */
define('SCHLIX_SITE_HTTPS_URL','');
...
define('SCHLIX_SITE_SSL_ENABLED',false);
define('SCHLIX_FORCE_SSL_ADMIN_LOGIN',false);
to:
<?php

define('SCHLIX_SITE_HTTP_URL','https://test-centos8.schlix.com');
define('SCHLIX_SITE_HTTPS_URL','https://test-centos8.schlix.com');
...
define('SCHLIX_SITE_SSL_ENABLED',true);
define('SCHLIX_FORCE_SSL_ADMIN_LOGIN',true);
Screenshots:

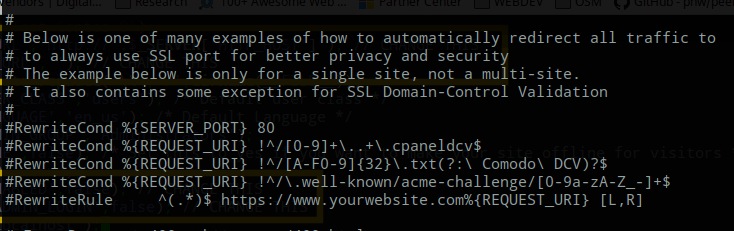
You will also need to edit the .htaccess file and change the domain to your domain. Simply uncomment the #.
RewriteCond %{SERVER_PORT} 80
RewriteCond %{REQUEST_URI} !^/[0-9]+\..+\.cpaneldcv$
RewriteCond %{REQUEST_URI} !^/[A-F0-9]{32}\.txt(?:\ Comodo\ DCV)?$
RewriteCond %{REQUEST_URI} !^/\.well-known/acme-challenge/[0-9a-zA-Z_-]+$
RewriteRule     ^(.*)$ https://test-centos8.schlix.com%{REQUEST_URI} [L,R]
Screenshots:

That's it, your website is ready to use:

Centos 8 LAMP (Linux, Apache 2.4, MySQL 8.0, PHP 7.2)